

Queen City Cowl – Crochet Pattern
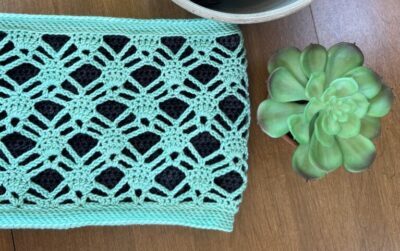
I love cowls! No surprise there. When I got the opportunity to work with Queen City Yarn and their new yarn, Latta, I knew what I wanted to make. I loved this subtle crown motif and thought it would be perfect for Charlotte, NC, the Queen City.
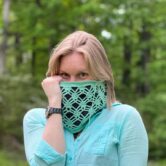
The cowl is designed a bit shorter in height than I normally make as the 2 layer construction lends a structure to the piece that doesn’t get slouchy and really shows off the lace design.
Color options for are almost endless. Go for a tone-on-tone monochromatic look for something more subtle. Or really amp up the wow factor with 2 contrast colors.
The Queen City Cowl is constructed in 2 separate layers. The lace overlay is worked flat and seamed along the short ends.The inner column is worked in hdc in the round. The 2 layers are connected by adding slip stitch edging on both the top and bottom edges.
 Queen City Yarn
This pattern was designed using Latta, a non-super wash, sport weight yarn from Queen City Yarn. There’s an amazing range of colors, perfect for creating a cowl unique for you!
Pattern Specs
Gather your supplies….
01
Skill Level
Intermediate Crochet
02
Hooks
Size 5 mm • H8
Size 4 mm • G6
03
Yarn Requirement
Sport weight, Category 2
MC 55 g – 180 yds / 165 m
CC 67g – 220 yds / 200 m
Shown in pattern pictures: Queen City Latta
MC – mint green, CC – charcoal
04
notions
Scissors
Locking/removable stitch markers
Tapestry needle
Gauge Swatch
- Continuous rounds of hdc with smaller hook: 20 sts x 18 rows
- Crowns Stitch (see special stitches) worked flat with larger hook: 20 sts x 10 rows
- Alternately, each repeat of the Crowns Stitch should be approx. 2″ / 5cm wide x 2.25″ / 5.75cm high.
CROWNS STITCH
Ch multiples of 10 + 12. See next page for crochet chart.
Setup Row:
Sc in 2nd ch from hook, sc in next ch, *ch 3, sk 3 ch, v-stitch in next ch, ch 3, sk 3 ch, sc in each of next 3 ch; rep from * to last 9 ch, ch 3, sk 3 ch, v-stitch in next ch, ch 3, sk 3 ch, sc in each of last 2 ch, turn.
Row 1:
Ch 1, sc in first sc, ch 4, *5 dc in 2 ch spc of v-stitch, ch 4, sc in center sc of 3 sc group, ch 4; rep from * to last v-stitch, 5 dc in 2 ch spc of last v-stitch, ch 4, sc in last sc, turn.
Row 2:
Ch 7, *sc in each dc of 5 dc group, ch 7; rep from * to last 5 dc group, sc in each dc of 5-dc group, ch 3, tc in last sc, turn.
Row 3:
Ch 3, dc in first st, ch 3, *sk sc, sc in each of next 3 sc, ch 3, v-stitch in fourth ch of ch-7 sp, ch 3; rep from * to last 5 sc group, sk sc, sc in each of next 3 sc, ch 3, 2 dc in turning ch from row below, turn.
Row 4:
Ch 3, 2 dc in first st, *ch 4, sc in center of 3 sc group, ch 4, 5 dc in ch-2 sp of v-stitch; rep from * to last 3 sc group, ch 4, sc in center of 3 sc group, ch 4, 3 dc in turning ch from row below, turn.
Row 5:
Ch 1, sc in first dc, sc in each of next 2 dc, *ch 7, sc in each of next 5 dc; rep from * across, ch 7, sc in each of next 2 dc, sc in turning ch from from row below, turn.
Row 6:
Ch 1, sc in first sc, sc in next sc, *ch 3, v-stitch in fourth ch of ch-7 sp, ch 3, sk sc, sc in each of next 3 sc; rep from * to last ch-7 sp, ch 3, v-stitch in fourth ch of last ch-7 sp, ch 3, sk sc, sc in each of last 2 sc, turn.
Rep rows 1-6.

Use whatever hook and yarn combination that allows you meet gauge.
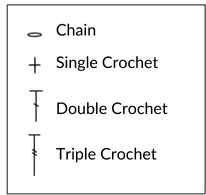
Abbreviations
CH – Chain
DC – Double Crochet
HDC – Half Double Crochet
Rep – Repeat
RS – Right Side
SC – Single Crochet
Sl – Slip
Sk – Skip
Spc – Space
St(s) – Stitch(es)
TBL – Through Back Loop
TFL – Through Front Loop
TC – Triple Crochet
YO – Yarn Over
Special Stiches:
V Stitch: (dc, ch 2, dc) in spc or st indicated
Queen City Cowl Pattern
COWL BODY
Outer Lace Layer
If you tend to have a tight tension when you work sl sts, you may want to go up a hook size for Row 1 and Row 17.
Using lighter color (MC) and larger hook, Ch 122
To increase or decrease the circumference of your cowl add or subtract multiple of 10 ch here. Each repeat of 10 ch is approx. 2″ / 5cm wide. This will change the amount of yarn required.
Row 1 (RS):
Sl st in back bump of 2nd ch from hook, sl st in back bump of all chs to end, turn. 121 sts.
Row 2:
Ch 1, sc in first st, sc in next st, *ch 3, sk 3 sts, v-stitch in next st, ch 3, sk 3 sts, sc in each of next 3 sts; rep from * to last 9 sts, ch 3, sk 3 sts, v-stitch in next st, ch 3, sk 3 sts, sc in each of last 2 sts, turn.
Rows 3-14:
Repeat Crowns Stitch rows 1-6 (see Special Stitches section) a total of 2 times.
If you would like to increase or decrease the height of your cowl, add or subtract full repeats here. Each repeat is approx 2.25″ / 6.25 cm high. This will change the amount of yarn required.
Row 15:
Repeat row 1 of Crowns Stitch.
Row 16:
Ch 5, *sc in each dc of 5 dc group, ch 5; rep from * to last 5 dc group, sc in each dc of 5-dc group, ch 2, tc in last sc, turn.
Row 17:
Ch 1, sl st tbl in each st and ch to last ch spc, sl st tbl next 2 ch. 121 sts.
Break yarn, leaving 15″ / 38 cm tail for seaming short ends.
Outer Lace Layer Finishing
Block the outer lace layer, making sure to open up the lace. It’s important to block at this stage. As you crochet the inner layer you need the outer layer to be at it’s final measurements so you can test the fit of the 2 layers together.
For reference, my outer lace layer measured 22″ x 5″ /55 x 12.5 cm unblocked and unstretched and 24″ x 6″ / 61 x 15.25 cm blocked.
Bring 2 short ends together with RS together. Whip st 2 short ends together using long tail.
Inner Layer
We will be starting out with a sl st/sc combo and finishing with sc/sl st. This makes for a cleaner transition when we’re working in continuous rounds.
Using darker color (CC) and smaller hook, Ch 121, join for working in the round, being careful not to twist your chs. The sl st join counts as the sl st in the sl st/sc combo. The first round will begin with a sc.
If you altered the st count for the outer layer, make sure to ch the same # of sts for the inner layer.
Setup Round:
Sc in back bump of next ch, hdc in back bump of each ch to end. Do not turn.
Round 1:
Hdc all sts.
Repeat Round 1, working in continuous rounds, until piece measures 6″ / 15.25 cm.
It’s a really good idea to periodically insert your partially complete inner layer into the outer layer to make sure everything is lying flat. If the outer layer is a bigger than the inner layer, rip back the inner layer and ch more sts to start. If the outer layer seems smaller than the inner layer, you need less ch sts to start. This is important for the finished look of your cowl. We want both layers to be as close as possible to the same size.
Inner Layer Finishing
Work 2 additional sts: sc in next st, sl st in following st.
Break yarn and secure last st.
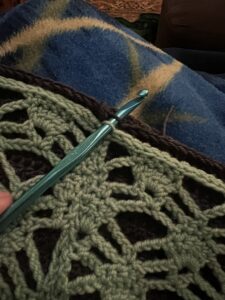
SLIP STITCH EDGING
If you tend to have a tight tension when you work sl sts, you may want to go up a hook size for this section.
Place the 2 layers of your cowl together with the lace layer on the outside and the hdc layer on the inside. Make sure the RS of the lace layer is facing out.
We’ll be working a sl st row to connect the 2 layers, then adding a sl st edging in continuous rounds.
Setup Round:
Using same color as outer lace layer (MC) and larger hook, start at the back seam of the outer lace layer, insert your hook tbl of st from the outer lace layer, then tfl of st from the inner hdc layer. YO and pull through all 3 loops on hook.Continue to sl st the 2 layers together around to end. Do not turn.
If you altered the st count for either layer your st count may not be 1:1 for the inner and outer layer.
*If you have more sts on the outer layer, you’ll work some outer layer decreases as follows: Insert hook tbl of st from outer layer, insert hook tbl of next st from outer layer, insert hook tfl of inner layer. YO and pull through all 4 loops on hook. The difference in sts count between the outer and inner loop = # decreases worked. Spread these decreases even across Round 1.
*If you have more sts on the inner layer, you’ll work some inner layer decreases as follows: Insert hook tbl of st from outer layer, insert hook tfl of st from inner layer, insert hook tfl of next st from inner layer. YO and pull through all 4 loops on hook. The difference in sts count between the inner and outer loop = # decreases worked. Spread these decreases even across Round 1.
Round 1-4:
Sl st tbl all sts.
Break yarn and secure last st.
Repeat sl st edging Setup round and rounds 1-4 on the other edge.
Weave in all ends and block as necessary.